Whether you are setting up a server room, a network closet, or an edge computing node, the wall mount cabinet is often the first piece of infrastructure that determines how well your entire IT environment performs. A wall mount cabinet is more than a metal box bolted to a wall — it is the structural backbone that holds your switches, patch panels, routers, and small servers together in a safe, organized, and accessible way.
In this comprehensive guide, we will walk you through everything that matters when choosing a wall mount cabinet: structural integrity, ventilation, cable management, security, smart-ready upgrades, and the specifications that separate a professional-grade product from a generic shelf solution. We will also reference the LNH Series server rack — one of the most capable heavy-duty cabinets available — to show how the best wall mount cabinet designs are engineered.
- What Is a Wall Mount Cabinet and Why Does It Matter?
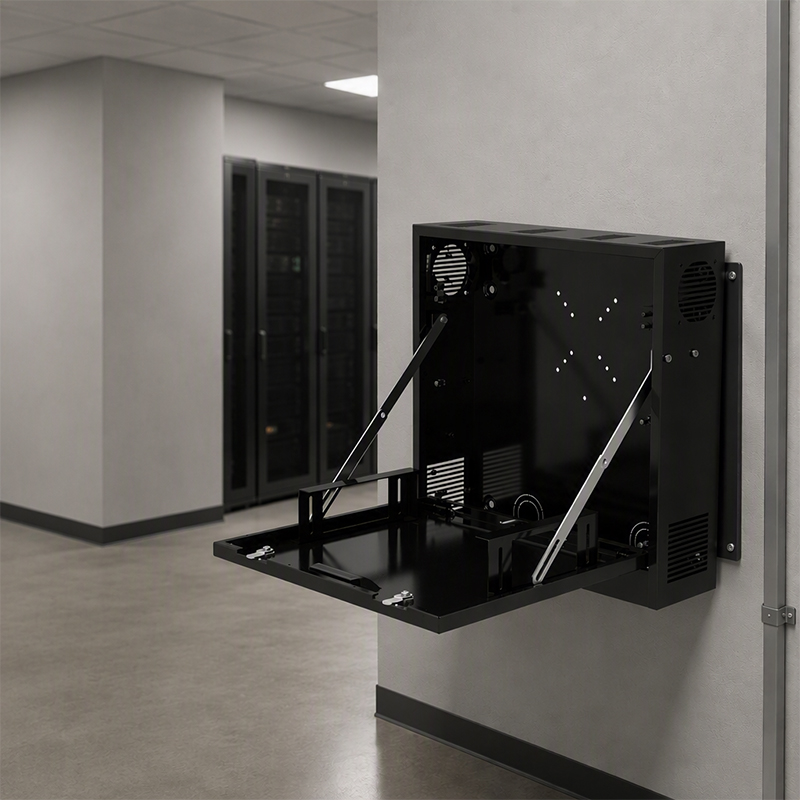
A wall mount cabinet is a rack enclosure designed to be fixed directly to a wall surface, saving floor space while providing protected housing for networking and computing equipment. Unlike full-floor standing server racks, a wall mount cabinet is ideal for smaller deployments, branch offices, wiring closets, educational institutions, retail locations, and any environment where rack density is moderate and floor space is limited.
The importance of selecting the right wall mount cabinet cannot be overstated. A poorly engineered enclosure can lead to overheating equipment, cable chaos, unauthorized access, and structural failures. A well-designed wall mount cabinet, on the other hand, extends the life of your equipment, simplifies maintenance, and keeps your network infrastructure operating reliably for years.
Today’s market offers wall mount cabinet solutions ranging from open-frame designs to fully enclosed steel enclosures with perforated doors, locking systems, adjustable rails, and even smart monitoring capabilities. Understanding the key specifications before you purchase will help you choose a wall mount cabinet that meets your current needs while leaving room for future growth.
- Key Dimensions and Size Options for a Wall Mount Cabinet
One of the most critical decisions you will make when selecting a wall mount cabinet is choosing the right size. The wrong dimensions can mean equipment does not fit, airflow is restricted, or the enclosure cannot bear the weight of your gear.
Depth Options: 600 mm vs 800 mm
Depth is arguably the most important dimension for a wall mount cabinet. Standard depth options are 600 mm and 800 mm. A 600 mm deep wall mount cabinet works well for patch panels, switches, and lightweight networking gear. An 800 mm deep wall mount cabinet is better suited for servers and deeper equipment — particularly 1U and 2U rack-mounted servers that require rear cable access.
When mounting the LNH Series to a wall or selecting depth for a standard wall mount cabinet deployment, the 800 mm depth option is recommended whenever the installation includes servers or high-density patch cabling. The extra depth provides room for rear cable management and better airflow between the equipment and the rear door.
Width Options: 600 mm, 800 mm, 1000 mm, and 1200 mm
Width determines how much equipment you can fit side by side and influences whether cable management accessories can be installed alongside equipment in the same wall mount cabinet. Standard 19-inch rack equipment fits into any of these widths, but wider options provide more room for vertical cable managers, PDUs, and other accessories.
- 600 mm wide: compact installation, minimal footprint, ideal for wiring closets
- 800 mm wide: most popular width for a wall mount cabinet; accommodates vertical cable managers on either side of 19″ rails
- 1000 mm wide: used when additional side space is needed for cable routing or supplemental components
- 1200 mm wide: high-density installations where multiple PDUs, cable managers, and accessories are required
Height: 18U to 60U
The unit height (U) of a wall mount cabinet determines how many rack-mounted components you can house. One rack unit (1U) equals 44.45 mm (approximately 1.75 inches). A compact wall mount cabinet might start at 18U, which is sufficient for small network closets. For larger deployments, the LNH Series scales all the way to 60U — providing a wall-friendly profile while supporting extensive hardware installations.
When planning U-height for your wall mount cabinet, always calculate your current equipment needs and then add at least 25–30% additional capacity for future expansion. Running out of rack space in a wall mount cabinet after installation is a costly and disruptive problem to solve.
- Structural Integrity: Why Frame Rigidity Defines a Quality Wall Mount Cabinet
Not all wall mount cabinet enclosures are built with the same structural engineering. The frame of a wall mount cabinet must simultaneously resist the static load of mounted equipment, absorb vibration from fans and drives, and maintain dimensional stability so that doors and panels close correctly over years of use.
The LNH Series wall mount cabinet achieves exceptional frame rigidity through a special plate-curving technique. Rather than using simple flat steel sheets, the frame components are precision-bent to create an integrated box-beam structure. This engineering approach dramatically increases resistance to bending and racking forces compared to conventional flat-panel construction.
Load Capacity: Up to 1,500 kg
One of the most impressive specifications of the LNH Series as a wall mount cabinet platform is its load capacity of 1,500 kg. This far exceeds most standard wall mount cabinet specifications, which typically range from 200 kg to 600 kg for mid-range products. The 1,500 kg rating means this wall mount cabinet can support dense, fully loaded server configurations without risk of structural failure.
When evaluating any wall mount cabinet, always compare the rated static load against your expected equipment weight — and include the weight of cables, cable managers, PDUs, and accessories in your calculation. A wall mount cabinet that is loaded to more than 80% of its rated capacity can suffer premature fatigue in mounting hardware and door hinges.
IP20 Safety Rating
The LNH Series wall mount cabinet carries an IP20 safety class rating. IP20 indicates protection against solid objects larger than 12 mm — including accidental hand contact with live parts — but does not provide protection against water ingress. For most indoor IT environments, an IP20 rated wall mount cabinet is the appropriate standard. Applications requiring moisture protection, such as light industrial or outdoor-adjacent installations, should seek a wall mount cabinet with a higher IP rating.
- Door Design and Access in a Professional Wall Mount Cabinet
The doors of a wall mount cabinet play a dual role: they protect internal equipment while providing the access IT technicians need to install, replace, and maintain hardware. A well-engineered door system is one of the defining characteristics of a professional-grade wall mount cabinet.
Front Door: Curved Perforated Design with Swing Handle Lock
The LNH Series wall mount cabinet features a curved perforated front door secured by a swing handle lock. The curved aerodynamic profile is not merely aesthetic — it increases rigidity and channels airflow more effectively than flat door designs. The perforations allow warm air to exit the front of the wall mount cabinet while cool air is drawn in through the rear, supporting natural convection cooling.
The swing handle lock provides secure yet convenient access for authorized personnel. Compared to a standard key lock, a swing handle lock on a wall mount cabinet gives tactile confirmation that the door is fully latched and reduces the risk of accidental door opening due to vibration.
Rear Doors: Double Flat Perforated Split Design
The rear of the LNH Series wall mount cabinet uses double flat perforated split rear doors, also secured with swing handle locks. The split (two-panel) design is particularly practical in tight spaces where a single wide rear door would require clearance that a wall mount cabinet installation cannot always provide. Both panels open independently, giving technicians precise access to specific cable or equipment zones.
120° Door Opening Angle
Both the front and rear doors of this wall mount cabinet open to a full 120° angle. This wide opening angle is essential for safe equipment installation and removal. Narrow door openings force technicians to awkwardly maneuver servers and switches around door edges — increasing the risk of equipment damage and personal injury. The 120° opening angle on this wall mount cabinet eliminates that problem entirely.
Left-to-Right Door Stop Reversibility
A frequently overlooked feature in a wall mount cabinet is the ability to reverse the door swing direction. The LNH Series wall mount cabinet allows the door stop to be easily changed from left to right. This is critically important during installation planning: if a wall mount cabinet is positioned near a corner or adjacent to another enclosure, you need the flexibility to open the door away from obstructions.
- Side Panel Design and Quick-Release Access
Side panels on a wall mount cabinet serve multiple purposes: they close the enclosure for security and dust protection, support structural integrity, and provide an additional access point for cabling and maintenance.
The LNH Series wall mount cabinet uses quick-release lockable side panels. The quick-release mechanism means technicians can remove a side panel without tools in seconds — a significant advantage during cable pulling or equipment changes. The locking feature ensures the panel cannot be removed by unauthorized personnel, maintaining the security integrity of the wall mount cabinet.
Quick-release side panels also reduce the risk of damage to panel mounting hardware over repeated maintenance cycles. Traditional side panels secured with multiple screws are often over-tightened or stripped during maintenance, gradually weakening the panel’s fit. A quick-release design on a wall mount cabinet avoids this progressive wear.
- Ventilation and Thermal Management in a Wall Mount Cabinet
Heat is the primary enemy of electronic equipment longevity. A wall mount cabinet that traps heat will shorten the lifespan of switches, servers, and power supplies. Effective thermal management must be engineered into the wall mount cabinet from the ground up — not added as an afterthought.
75% Perforation Rate for Maximum Airflow
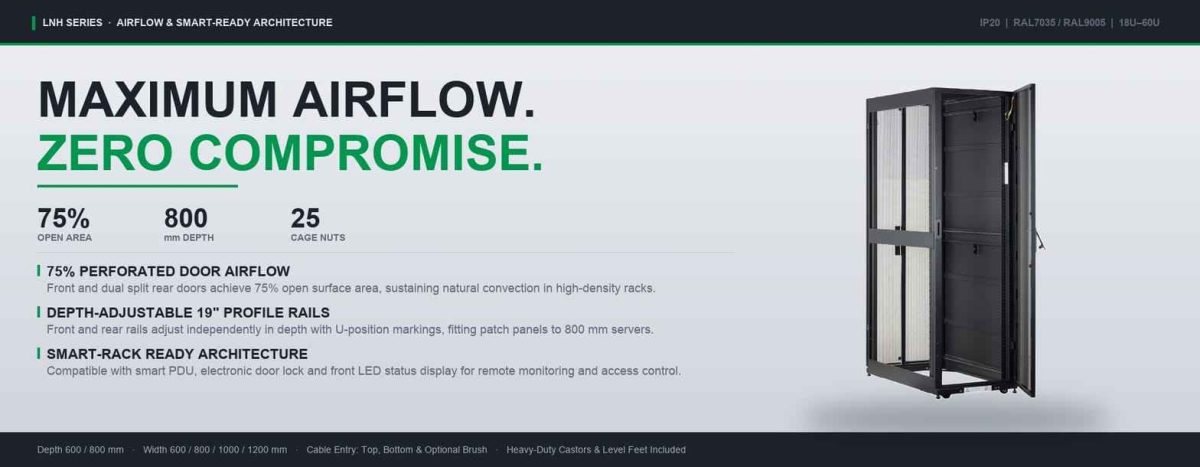
The LNH Series wall mount cabinet achieves a 75% airflow rate through its front and rear perforated doors. This is an outstanding figure for an enclosed wall mount cabinet. At 75% perforation, the majority of each door’s surface area is open to airflow, allowing hot air to escape rapidly and cool air to enter from the rear without significant restriction.
For IT professionals comparing wall mount cabinet specifications, airflow percentage is one of the most meaningful metrics available. Many budget wall mount cabinet products achieve only 40–50% perforation, which can cause inlet air temperatures to rise significantly in high-density deployments.
Top and Bottom Cable Entry with Ventilation Consideration
The LNH Series wall mount cabinet includes large cable entry apertures at both the top and bottom of the enclosure, covered with black cellular panels. These cellular covers allow cables to pass through while minimizing air bypass — preventing unconditioned ambient air from short-circuiting the airflow path inside the wall mount cabinet. Maintaining a sealed airflow path is particularly important in warm environments or when rack-mounted servers are operating at high utilization.
Optional Brush Cable Entry at Any Position
Beyond the standard top and bottom entry points, this wall mount cabinet allows brush cable entry panels to be installed at virtually any position on the enclosure. Brush panels provide the same air-sealing benefit as cellular panels but accommodate multiple cables passing through the same opening more flexibly. This flexibility is especially valuable in a wall mount cabinet used as a distribution point where many cable types — fiber, copper, power — need to enter from multiple directions.
- 19-Inch Profile Rails and Equipment Mounting in a Wall Mount Cabinet
The 19-inch equipment standard has been the universal rack format for decades, and every professional wall mount cabinet should be designed around it. The profile rails (also called mounting rails or rack rails) are the primary structural interface between your equipment and the wall mount cabinet frame.
Front and Rear Mounting Rails
The LNH Series wall mount cabinet installs 19-inch profile rails at both the front and rear of the enclosure. Front-and-rear rail support is essential for anything heavier than lightweight switches and patch panels. Servers, UPS units, and high-density fiber panels must be supported at both ends to prevent cantilever stress on equipment chassis and avoid long-term damage to rack-mount ears.
Depth-Adjustable Rails
A significant technical advantage of this wall mount cabinet is that the 19-inch profile rails are adjustable in depth. This allows the rail position to be moved forward or backward within the enclosure, accommodating equipment of varying depths without requiring additional hardware. Depth-adjustable rails make a wall mount cabinet far more versatile over its service life, as equipment changes and technology generations evolve.
Unit Markings on Profile Rails
Every rail in this wall mount cabinet includes clear unit (U) markings. U markings allow technicians to quickly identify mounting positions, plan equipment layouts, and document rack configurations accurately. In a wall mount cabinet that is installed at height, being able to read U positions clearly without removing equipment is a practical time-saving feature during both initial setup and ongoing maintenance.
25 Sets of Cage Nuts Included
Unlike many competing products that require cage nuts to be purchased separately, the LNH Series wall mount cabinet includes 25 sets of cage nuts as standard. Cage nuts are the fasteners that secure rack-mount equipment to the profile rails. Having them included with the wall mount cabinet saves time and cost during initial deployment and ensures compatibility between the nuts and the rail profile.
- Cable Management in a Wall Mount Cabinet
Organized cable management is one of the most visible differences between a professionally managed wall mount cabinet installation and an improvised one. Properly routed cables improve airflow, reduce the risk of accidental disconnections, simplify troubleshooting, and make the wall mount cabinet easier to expand in the future.
Horizontal and Vertical Cable Management Options
The LNH Series wall mount cabinet supports both horizontal and vertical cable management channels as optional accessories. Horizontal cable managers sit between rack units and route patch cords laterally to the sides of the wall mount cabinet. Vertical cable managers run the full height of the enclosure along the side rails, keeping backbone cabling organized and separate from patch cords.
800 mm Wide Models Include 2 Vertical Cable Managers
For the 800 mm wide configuration of this wall mount cabinet, two vertical cable managers are included as standard — one on each side of the 19-inch rails. This is an important value-add: vertical cable managers typically cost extra and are often forgotten until after installation is complete. Including them as standard in the 800 mm wall mount cabinet means installers can begin cable management immediately without waiting for additional orders.
- Mobility and Installation Flexibility for a Wall Mount Cabinet
While the primary mode of use for a wall mount cabinet is fixed installation, there are situations — during staging, testing, or facility relocation — where mobility matters. The LNH Series addresses this with heavy-duty castors and leveling feet.
Heavy-Duty Castors and Leveling Feet
The wall mount cabinet includes heavy-duty castors, allowing the fully assembled enclosure to be rolled into position before final wall mounting or during pre-deployment staging. Once in position, the leveling feet can be adjusted to stabilize the wall mount cabinet on uneven floor surfaces, ensuring the enclosure remains plumb and level before it is secured to the wall.
For data center operators who stage equipment off-site before deployment, the combination of castors and leveling feet means the wall mount cabinet can be loaded and tested in a staging area, then rolled to its permanent location with all equipment already installed — saving significant on-site installation time.
- Grounding, Safety Labels, and Compliance in a Wall Mount Cabinet
Electrical safety is a non-negotiable requirement for any wall mount cabinet installed in a professional IT environment. Ground faults in rack-mounted equipment can propagate through the cabinet frame and create shock hazards for technicians and equipment failures across multiple systems.
Grounding Wire Included
The LNH Series wall mount cabinet includes a grounding wire as standard equipment. The grounding wire connects the cabinet frame to the building’s electrical ground, ensuring that any fault current has a low-impedance path to ground rather than passing through connected equipment or personnel. This is a critical safety feature for any wall mount cabinet in a professional installation.
Warning and Compliance Stickers
The wall mount cabinet includes warning and compliance stickers pre-applied to the front and rear bottom frame. These labels provide essential safety information to technicians and meet the documentation requirements of various international compliance standards. Pre-applied labels save time during installation audits and equipment certification reviews.
- Smart-Ready Upgrades: Transforming a Wall Mount Cabinet into an Intelligent Infrastructure Hub
Modern IT infrastructure demands more than passive equipment housing. The ability to monitor, control, and automate systems remotely is rapidly becoming a baseline requirement — even for wall mount cabinet installations at branch offices and edge locations.
The LNH Series wall mount cabinet is specifically designed to support smart rack upgrades. Compatible accessories and integrations include:
- Smart PDU (Power Distribution Unit) for remote power monitoring, outlet-level switching, and consumption analytics
- Smart lock systems for remote access control, audit logging, and tamper alerts on the wall mount cabinet doors
- Front door LED screens for real-time status display of temperature, humidity, power consumption, and alerts directly on the wall mount cabinet face
For organizations managing distributed IT infrastructure across multiple locations, the ability to deploy a smart-enabled wall mount cabinet — rather than a passive enclosure — delivers substantial operational savings. Remote technicians can power-cycle equipment, verify door access events, and monitor environmental conditions inside the wall mount cabinet without dispatching on-site personnel.
The smart-ready architecture of the LNH Series wall mount cabinet aligns with the broader industry trend toward DCIM (Data Center Infrastructure Management) integration at the edge. As more computing workloads migrate to branch offices and field locations, the edge wall mount cabinet becomes a managed infrastructure node — not just a storage box.
- Color Options and Aesthetic Considerations for a Wall Mount Cabinet
While functionality is the primary criterion for selecting a wall mount cabinet, aesthetics matter in environments where the enclosure is visible to clients, executives, or the public.
The LNH Series wall mount cabinet is available in two standard finishes: RAL7035 light grey and RAL9005 black. RAL7035 light grey is the most common finish for data center and server room installations — it is visually neutral and makes dust and cable labels easier to see. RAL9005 black is preferred for environments where a more modern aesthetic is desired, such as open-plan offices, broadcast facilities, and creative industry workspaces.
- Packaging and Delivery: Flat Pack vs. Assembled
Logistics and packaging are practical considerations that are often overlooked when purchasing a wall mount cabinet online or through a distributor. A wall mount cabinet is a heavy, bulky item, and how it is packaged directly affects shipping cost, delivery condition, and installation time.
The LNH Series wall mount cabinet is available in two packaging formats: flat packing and assembly packing with a pallet. Flat packing reduces the volume of the shipment significantly, lowering freight costs — particularly important for international shipping of a large wall mount cabinet. Assembly packing with a pallet provides a pre-assembled enclosure ready for quick installation, reducing on-site labor time.
For importers and distributors managing multiple wall mount cabinet units across a project, flat pack shipping reduces warehouse storage volume and allows more units to be shipped per container — a meaningful cost advantage at scale.
- How to Select the Right Wall Mount Cabinet for Your Application
With so many specifications to consider, it helps to approach wall mount cabinet selection with a structured decision framework. Below is a practical checklist for evaluating any wall mount cabinet product:
- Define your equipment list: how many U of space do you need now, and how much growth do you anticipate in the next 3–5 years?
- Measure your equipment depth: ensure the wall mount cabinet depth (600 mm or 800 mm) accommodates your deepest piece of equipment with room for rear cable management.
- Calculate total equipment weight: compare this to the wall mount cabinet’s rated load capacity, and confirm your wall structure can support the total installed weight.
- Assess your airflow requirements: check the perforation rate of the wall mount cabinet doors and determine whether active cooling fans will be needed.
- Evaluate security requirements: does the wall mount cabinet need key locks, electronic access control, or smart lock integration?
- Plan your cable management: determine whether horizontal managers, vertical managers, or both will be needed in your wall mount cabinet.
- Check smart-readiness: if remote monitoring or power management is required, confirm the wall mount cabinet is compatible with smart PDUs and environmental sensors.
- Confirm color and finish: match the wall mount cabinet finish to your environment’s aesthetic requirements.
- Common Mistakes to Avoid When Installing a Wall Mount Cabinet
Even with the right wall mount cabinet selected, installation errors can undermine performance and safety. Here are the most common mistakes to avoid:
Underestimating Wall Load Capacity
A wall mount cabinet loaded with servers, switches, UPS units, and cable infrastructure can easily exceed 200 kg. Always confirm that the wall structure — and specifically the anchor points — can support the total weight of the wall mount cabinet and all installed equipment. Consult a structural engineer if you are mounting a large wall mount cabinet in a non-masonry wall.
Ignoring Rear Door Clearance
The rear doors of a wall mount cabinet must open fully for cable management and equipment access. Plan sufficient clearance between the rear of the wall mount cabinet and any adjacent wall, column, or obstruction. The 120° rear door opening angle of the LNH Series requires approximately 500–600 mm of clearance from the cabinet’s rear edge.
Overloading a Single Wall Mount Cabinet
It is tempting to keep adding equipment to an existing wall mount cabinet rather than deploying a second enclosure. Overloading a wall mount cabinet compromises airflow, increases the risk of structural fatigue, and makes cable management progressively more difficult. Respect the rated load and U-capacity of your wall mount cabinet.
Skipping Grounding
Every wall mount cabinet installation must include proper bonding and grounding. The grounding wire provided with the LNH Series wall mount cabinet must be connected to a verified ground point in the building’s electrical system. Skipping grounding is a safety code violation and creates risk of equipment damage and electrical shock.
Conclusion
Choosing the right wall mount cabinet is one of the most consequential decisions in any IT infrastructure project. The wall mount cabinet you select will determine how efficiently your equipment operates, how safely your team can maintain it, and how easily your infrastructure can grow over time.
The LNH Series wall mount cabinet demonstrates what best-in-class engineering looks like across every dimension that matters: structural rigidity through plate-curving technology, 1,500 kg load capacity, 75% airflow through fully perforated doors, depth-adjustable 19-inch rails, integrated cable management, quick-release locking side panels, smart-ready compatibility, and a wide range of size options from 18U to 60U.
Whether you are deploying a single wall mount cabinet in a branch office closet or specifying dozens of wall mount cabinet enclosures across a distributed enterprise network, the principles remain the same: prioritize structural integrity, ventilation, cable organization, and security — and choose a wall mount cabinet that is engineered to grow with your infrastructure rather than limit it.
If you are ready to explore wall mount cabinet options for your next project, the LNH Series offers the specifications, smart-ready architecture, and build quality that demanding IT environments require. Contact us to discuss your specific wall mount cabinet requirements and find the right configuration for your application.